Face Recognition Task
The EyesOnIt Face Recognition task is where you manage the face recognition database that EyesOnIt uses across all cameras. Open it from the Config Tool task list.
Before a camera can alert on a specific person or group, that person needs to be enrolled here with at least one face image. Groups let you organize people logically — for example, by team, clearance level, or building access — so that camera configurations can target a whole group rather than maintaining individual names per camera.
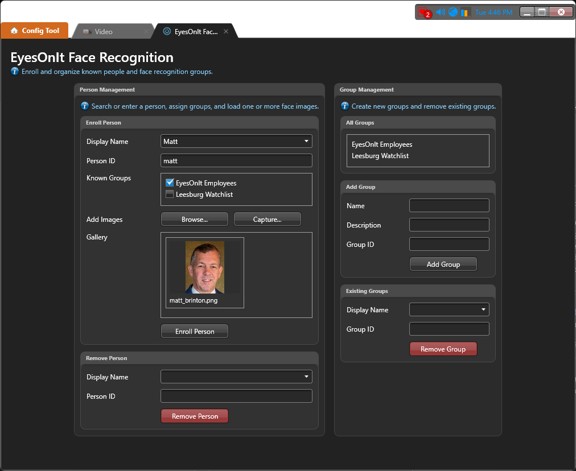
The page is divided into two columns. The left column handles person enrollment and removal. The right column handles group management.
Person enrollment
The enrollment card at the top of the left column is where you add new people or update existing ones.
| Field | Description |
|---|---|
| Display Name | The person's name as it will appear in search results and alerts. As you type, the field searches for existing enrollments and shows matching suggestions. If you select an existing person, their current data — including group memberships and enrolled images — is loaded into the form so you can review and update it. |
| Person ID | A unique identifier for this person in EyesOnIt. This is generated automatically from the display name, but you can edit it manually if your organization uses specific ID formats. |
| Known Groups | A scrollable list of all configured groups, each with a checkbox. Check any groups this person should belong to. |
Adding face images
Once you have filled in the name and groups, add one or more face images using the buttons below the group list:
- Browse... — opens a file picker. Supported formats: JPG, PNG, BMP, and JPEG.
- Capture... — opens a capture dialog so you can grab a frame directly from a camera stream.
The images you select appear as thumbnails in a gallery. You can see the filename under each one and remove any image individually if needed.
Providing multiple images of the same person — ideally from different angles or lighting conditions — improves recognition accuracy in real-world conditions.
When you are ready, click Enroll Person to save the enrollment to EyesOnIt.
Updating an existing enrollment
The enrollment form works the same way for updates. Type the person's name, select the matching suggestion from the autocomplete list, review their current groups and images, make any changes, and click Enroll Person again. The existing enrollment will be updated.
Person removal
The removal card in the lower part of the left column lets you remove a person from the EyesOnIt database.
| Field | Description |
|---|---|
| Display Name | Type to search for an existing person and select them from the autocomplete list. |
| Person ID | Populated automatically when you select a person. You can also type the ID directly if you know it. |
Click Remove Person to permanently delete the enrollment. This cannot be undone, so make sure you have selected the right person before confirming.
Group management
The right column contains the tools for creating and removing groups.
Viewing groups
The All Groups list at the top of the right column shows all currently configured groups. Hovering over a group entry shows its internal ID as a tooltip.
Adding a group
| Field | Description |
|---|---|
| Name | The display name for the group, as it will appear in detection settings and search results. |
| Description | An optional note about the group's purpose. |
| Group ID | A unique identifier for the group. |
Click Add Group to create it. The new group will immediately appear in the All Groups list and become available for selection in the person enrollment form.
Removing a group
| Field | Description |
|---|---|
| Display Name | Type to search for an existing group and select it from the autocomplete list. |
| Group ID | Populated automatically when you select a group. |
Click Remove Group to delete it. Note that removing a group does not automatically remove the people who belong to it — those enrollments remain intact. Any camera configurations that reference the deleted group will need to be updated separately.